Posts tonen met het label Cricut. Alle posts tonen

woensdag 26 januari 2011

Dance My Darling

Dit kaartje heb ik gemaakt voor mijn ouders die aanstaande zondag 24 jaar getrouwd zijn.
I've made this card for my parents who are married for 24 years coming Sunday.

Ik heb de digi Dance My Darling van Karen's Doodles gebruikt. Ik vind dit zo'n schattige digi....
I've used the digi Dance My Darling from Karen's Doodles. I think this digi is so cute...

Derwent Coloursoft potloden: C100-C130-C180-C200-C530-C580-C650-C670-C680-C700

Ik ben weer eens lekker met mijn Cricut Expression bezig geweest. Ik heb hem de laatste tijd niet zoveel gebruikt, dus daar moet verandering inkomen! Ik heb de cijfers 24, de swirl en het hartje uitgesneden met de cartridge Don Juan en de bloem met Accent Essentials.
I've been nice busy with my Cricut Expression. I haven't used him often the last time, so that has to be changed! I've cut the numbers 24, the swirl and the heart with cartridge Don Juan and the flower with Accent Essentials.

-digistamp Dance My Darling van Karen's Doodles ingekleurd met Derwent Coloursoft potloden
-scrappapier Olivia van Basic Grey
-ColorCore cardstock Heartfelt
-Papicolor cardstock
-Nestabilities Standard Circle Large en Scalloped Circle Large
-Cricut Expression, Don Juan, Accent Essentials
-bloemetje gemaakt met de pons baby blooms van McGill
-1 parel
-1 grote brad

Nog een fijne dag!
Have a nice day!

xxx Anne-Marije

woensdag 17 november 2010

Doosje met laatje voor stempelafdrukjes

Ik heb een tutorial voor jullie gemaakt. In de tutorial laat ik zien hoe je onderstaand doosje kunt maken...


Het is een doosje met ee
n laatje. Ik heb de maten zo gemaakt dat er precies een stapel stempelafdrukjes in past.

Benodigdheden:

-Metric Scor-Pal, Cuttlebug, Cricut Expression, Dahle snijmachine, heattool, eyelettool
-1 stuk cardstock van 23,8 x 20 cm

-1 stuk cardstock v
an 28 x 12 cm
-1 stuk cardstock van 12 x 16 cm

-1 stuk scrappapier van 4 x 15,8 cm

-5 labels gesned
en met de Cricut Expression, cartridge Accent Essentials en Cricut Designstudio
-digistamp van Pronty
-Derwent Coloursoft potloden
-scrappapier Eline’s huis van Eline Pellinkhof

-Spellbinders Shapeabilities Flower Creations
-embossingstencil Cottage Floral

-wit embossingpoeder
Personal Impressions Puff White
-transparante inkt van Versamark

-Clearstampset Stampology ticketed

-zwarte Archival inkt

-3 roosjes
-2 mini brads

-1 Hitch Fastener van Tim Holtz

Voor het maken van het doosje heb je de Metric Scor-Pal nodig voor het rillen van de vouwlijnen. De labels zijn uitgesneden met de Cricut Expression, de Cricut Designstudio en de cartridge Accent Essentials. De labels zijn vervormd in de Cricut Designstudio om passend te maken voor het doosje.

De maten van de labels zijn in inches:
-wit cardstock 7,12 x 5,5 inch
-roze cardstock 6,62 x 5 inch
-scrappapier 6,12 x 4,5 inch

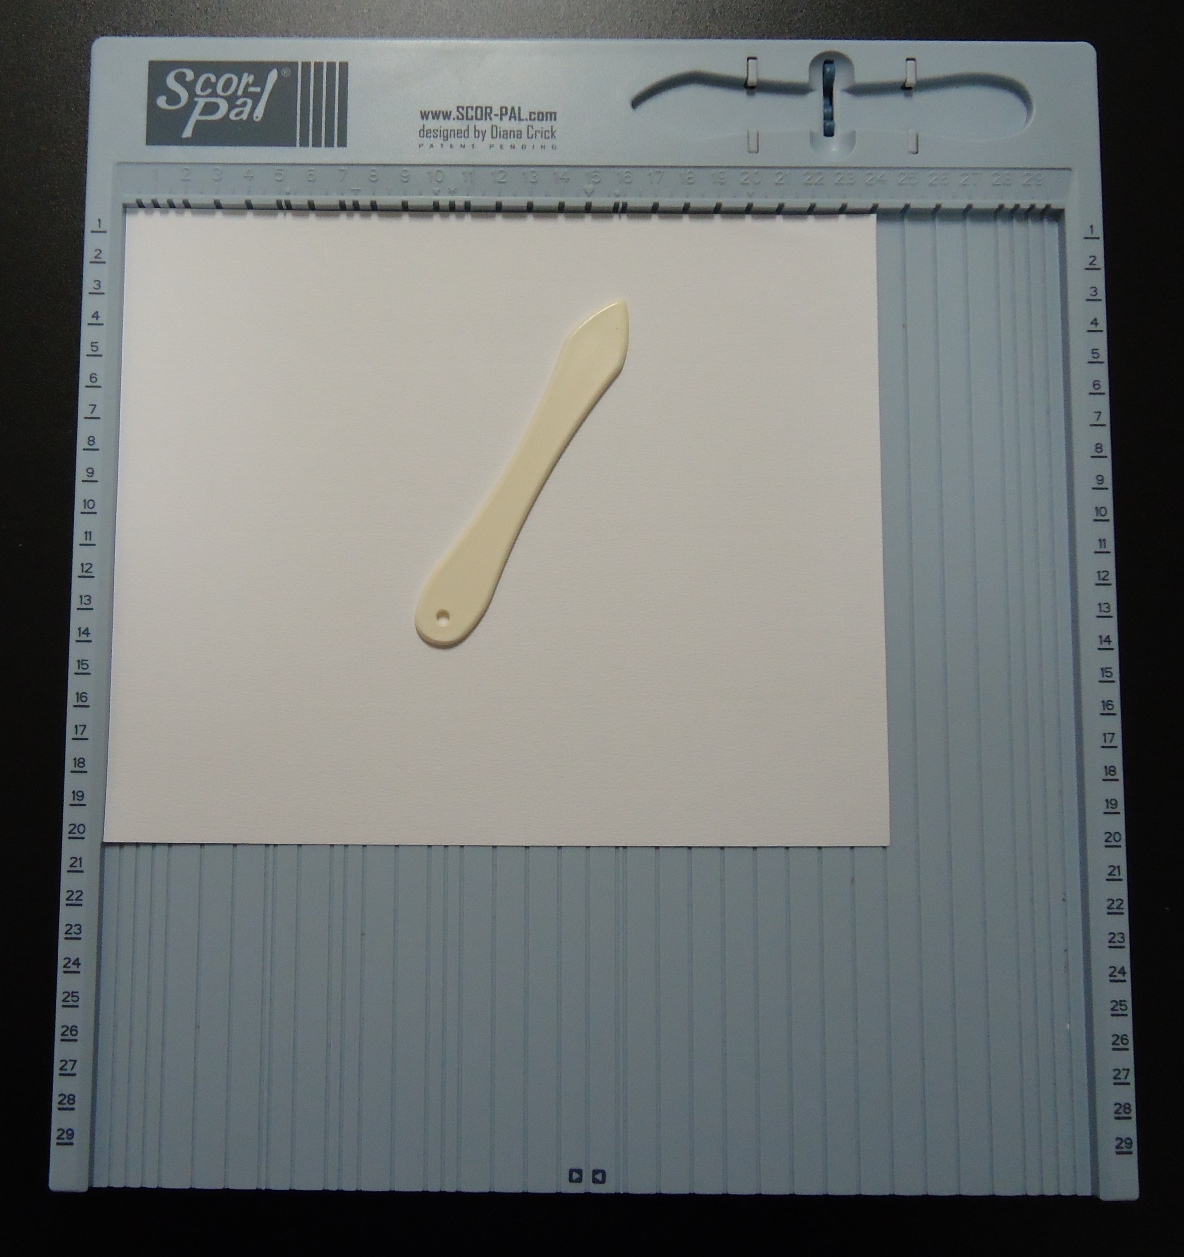
Leg nu het cardstock van 28 x 12 cm in je Scor-Pal. Leg het papier zo dat de kant van 28 cm bovenaan ligt (zie foto).
Ril het cardstock op 2 en 6 cm. Draai het cardstock 180 graden en ril nogmaals op 2 en op 6 cm. Dit is het omhulsel van het laatje.

Leg nu het cardstock van 23,8 x 20 cm in je Scor-Pal. Ril op 4 cm en draai je cardstock 90 graden en ril nogmaals op 4 cm. Doe dit bij alle zijdes. Dit wordt het laatje. Snijd aan de lange zijden de flapjes bij de hoeken los.

Vouw nu alle gerilde lijnen. Om de vouw mooi scherp te maken kun je de Scor-Tool van de Scor-Pal gebruiken.

Plak het scrappapier van 4 x 15,8 cm op de voorkant van het laatje. Meet precies het middelpunt uit en maak op die plaats met behulp van een eyelettool een gaatje (zie foto).

In het gaatje komt de Hitch Fastener van Tim Holtz (zie foto).

Nu kan alles op elkaar geplakt worden. Ik heb het doosje versierd met scrappapier van Eline Pellinkhof, Eline's huis.

Ook heb ik een digistamp van Pronty gebruikt. Dit lieve meisje heet Fleur met kat.

Derwent Coloursoft potloden: C180-C210-C340-C390-C510-C530-C560-C590-C650-C670

Het tekstje heb ik met zwarte Archival inkt. Het gave stempeltje komt uit de Stampology clearstampset Ticketed. In het doosje komen de afdrukjes die ik nog moet gaan kleuren. Omdat ik kleuren het leukste vind om te doen heb ik het tekstje Favorite Playtime gebruikt... :-)

Ik heb de bloemen uitgesneden met de Cuttlebug en de stans Shapeabilities Flower Creations van Spellbinders. De roze delen zijn geëmbost met embossingstencil Cottage Floral en daarna bewerkt met transparante inkt van het merk Versamark. Daarna heb ik op de vochtige inkt wit embossingpoeder gestrooid en dit verhit met de heattool. De bloemen zijn vastgezet met een mini brad.

Ik vond het heel leuk om dit doosje te ontwerpen, te maken en de tutorial voor jullie uit te schrijven! Ik hoop dat jullie het resultaat ook leuk vinden.

Ik ben benieuwd naar jullie reacties...

Nog een fijne avond!

xxx Anne-Marije

vrijdag 15 oktober 2010

Team Effort...

Dit kaartje heb ik gemaakt met een heel lief stempel van Penny Black, Team Effort.
I've made this card with a very cute stamp from Penny Black, Team Effort.


Het scrappapier is van October Afternoon. De bloemen heb ik gemaakt met mijn Cricut Expression, met de cartridge Accent Essentials.
The designpaper is from October Afternoon. I've made the flowers with my Cricut Expression, with the cartridge Accent Essentials.

Derwent Coloursoft potloden: C010-C130-C180-C210-C340-C440-C450-C510-C530-C560-C570-C590-C600-C630-C640-C650-C670-C690-C710

De randpons is van Martha Stewart en heet Two Dot.
The edgepunch is from Martha Stewart and calls Two Dot.

-stempel Team Effort van Penny Black ingekleurd met Derwent Coloursoft potloden
-scrappapier van October Afternoon
-Papicolor cardstock
-bloemen gemaakt met Cricut Expression, cartridge Accent Essentials
-Martha Stewart randpons Two Dot
-2 grote brads
-2 parels

Nog een fijne avond!
Have a nice evening!

xxx Anne-Marije

zondag 26 september 2010

Merry Christmas with Happy Hoppers!

Voor dit kaartje heb ik een lief stempel van Happy Hoppers gebruikt. Het is een groot stempel, maar echt geweldig om in te kleuren. Ik vind ze nog leuker dan de House Mouse stempels, want die konijntjes zijn zo schattig.... Create4fun heeft nog veel meer leuke Happy Hoppers, dus ga eens in de webwinkel kijken!
For this card I've used a lovely stamp from Happy Hoppers. It's a big stamp, but fantastic to colour. I like them even more than the House Mouse stamps, because the Hoppers are so huggable.... Create4fun has many more Happy Hoppers, so take a look in the webshop!

Derwent Coloursoft potloden: C010-C070-C080-C090-C180-C400-C410-C430-C510-C530-C540-C630-C640-C660-C670

Het strikje heb ik gemaakt met de strikjesmaker van Joy!, dit is echt een ideale tool om mooie strikjes te maken.
I've made the bow with the bowmaker from Joy!, this is an ideal tool to make some wonderful bows.

Het sterretje heb ik uitgesneden met mijn Cricut Expression, met de cartridge Accent Essentials.
I've cut the star with my Cricut Expression, with the cartridge Accent Essentials.

De hoeken van de kaart en van het afdrukje heb ik afgerond met de Crop-A-Dile Corner Chomper. Ik vind het toch net iets extra's geven aan de kaart... Ik ben nog steeds dol op deze tang.
The corners of the card and the image are punched with the Crop-A-Dile Corner Chomper. I think it give something extra to the card... I still adore this tool.

-stempel Carrot Tree van Happy Hoppers ingekleurd met Derwent Coloursoft potloden
-scrappapier van Cricut uit het blok Animal Kingdom
-Papicolor cardstock
-Nestabilities Petite Ovals
-ster gemaakt met de Cricut Expression, Accent Essentials
-strikje gemaakt met de strikjesmaker van Joy!
-4 parels
-tekstje gemaakt op de computer
-hoekjes kaart en afdrukje afgerond met de Crop-A-Dile Corner Chomper

Nog een fijne zondag!
Have a nice Sunday!

xxx Anne-Marije

zaterdag 25 september 2010

Happy Birthday Marij!!

Onze oudste dochter is van de week alweer 25 jaar geworden.
Heb dit kaartje voor haar gemaakt.
Marij en 25 zijn met de Cricut Design Studio en met cricutcartridge alfabet Alhpalicious uitgesneden.
De bloemen op de voorkant zijn met de papershapers Large en medium van EK Succes geponst.
De blaadjes komen van een creatables van Marianne Design.
Vlinders van Crealies.


De shoppende meid is een digi van Mo Manning , deze digi is uitgeponst met de nestabilitiesset
Classic Ovals. Daarachter een Paper Doilies geplakt.
Ook deze blaadjes komen van de creatables van Marianne Design.
Voor de voelsprieten van de vlinders heb ik meeldraadjes gebruikt.

De cirkel en het randje is uitgestanst met de nestabilitiesset Standard Petite Circles.
Daarachter een stukje mica geplakt, zodat het lijkt of de Magnolia in de open lucht hangt
De swirl en takjes zijn ook weer van een creatables van marianne Design; Swirl Leaf en Open Flower Hip
De randjes van de bloemen nog met de Doily Lace uitgeponst


Groetjes van Bernadet

woensdag 15 september 2010

Cute little frog

Ik heb een tasje gemaakt met behulp van de Cricut Expression. Ik zal hieronder stap voor stap laten zien hoe ik dat gedaan heb.
I've made a bag with the aid of the Cricut Expression. Below I'll show step by step how I've done that.

Wat heb je nodig?
What do you need to have?


-Cricut expression
-Cricut Design Studio
-Cricut cartridges: Accent Essentials, Create a Critter, Plantin Schoolbook
-designpaper from Basic Grey, Olivia
-ColorCore cardstock: Meadow, Leapfrog, Satin Rose and Tank
-black Papicolor cardstock
-a piece of mica
-Cuttlebug embossing stencil Floral Screen
-ric-rac ribbon
-2 brads
-quickutz Washers die
-Distress ink Forest Moss

Het tasje heb ik bewerkt met de Cricut Design Studio. Ik heb het tasje wat uitgerekt door het hoger te maken en ik heb er een ovaaltje uitgesneden. Beide figuren, het tasje en het ovaaltje, komen van de cartridge Plantin Schoolbook.
I've worked the bag in the Cricut Design Studio. I've stretched the bag through made it a little bit higher and I've cut an oval out of it. Both figures, the bag and the oval, are from the cartridge Plantin Schoolbook.


Daarna heb ik het tasje uitgesneden met de Cricut Expression.
After that I've cut the bag with the Cricut Expression.


Na het snijden haal je het tasje voorzichtig van de snijmat met behulp van de speciale Cricut spatel.
Atfer the cutting you can take the bag carefully from the cutting mat with the aid of the special Cricut spatula.

Op het tasje heb ik een kikkertje gemaakt met de cartridge Create a Critter. In het boekje van de cartridge kun je precies zien uit hoeveel lagen de kikker bestaat. Snijd de verschillende lagen uit in de verschillende kleuren cardstock.
On the bag I've made a little frog with the cartridge Create a Critter. In the book of the cartridge you can exactly see how many layers the frog contents. Cut the different layers with the different colours cardstock.


Ik heb 2 bloemen gesneden met de cartridge Accent Essentials. De roze rondjes op de bloemen zijn washers, gemaakt met een Quickutz stans. Zo komen de brads mooier uit.
I've cut 2 flowers with the cartridge Accent Essentials. The pink circles on the flowers are washers, made with a Quickutz die. Now the brads look more beautiful.

Ik heb een stukje mica geembost met Cuttlebug embossing stencil Floral Screen.
I've embossed a piece of mica with Cuttlebug embossing stencil Floral Screen.

Een overzicht van alle uitgesneden figuren.
An overview of all the cutted figures.


Dan kan nu het tasje in elkaar gezet worden. Het tasje zelf heb ik geplakt met dubblezijdig tape, het ric rac lintje met Tacky Glue van Aleene's, de kikker en de bloemen op foamtape. Als afwerking heb ik alle randen van het tasje bewerkt met Distress inkt Forest Moss.
Now the bag can be made together. I've stick the bag with doublesided tape, the ric rac ribbon with Tacky Glue from Aleene's, the frog and the flowers with foamtape. As finishing touch I've inked all the edges of the bag with Distress ink Forest Moss.

En dan het resultaat...
End than the result...


Het scrappapier is dubbelzijdig, dus de binnenkant van het tasje ziet er ook leuk uit.
The designpaper is double-sided, so the inside of the bag is also looking nice.


De grote bloem heb ik uitgesneden op 8 cm.
I've cut the big flower on 8 cm.


Helaas is het moeilijk te zien dat het mica geembost is, maar zo kun je het wel aardig zien...
Unfortunately it's difficult to see that the mica is embossed, but so you can see it a little bit...

xxx Anne-Marije

vrijdag 19 maart 2010

Rising Flame!

Hi, there the weekend is nearly here and I hope you have lots of fun things planned to do :)
Something a bit different from me today...I have a fantasy art card to share with you.

This image is as always coloured with Copics. and I cut the large flames using the fireball from the 'Indie Art' Cricut Cartridge and the flame border at the base of the card is actually the Martha Stewart 'Grass' border punch.

Thanks for Visiting

Debbie x

woensdag 25 november 2009

Snow Much Fun!

Hi everyone I have a fun Christmas card to share with you today using lots of punches to create a pretty winter scene.


The image is by Penny Black and has been coloured with Copic Sketch Markers. The snowflake border was created using Martha Stewart punch around the page 'Snowflake' corner & border punches. The giant snowflake was cut on my Cricut machine and glittered with 'Twinklets' & 'Glamour Dust' and I punched lots of small snowflakes and glittered them in the same way.
Card Recipe
Stamps: 'Let it Snow' (1524K) & 'Each Friend' (3261F) sentiment stamp both by Penny Black.
Colouring Medium: Memento ink & Copic Sketch Markers.
Card: ColorCore cardstock from Create4Fun.
Paper: 'Rooftop' by Basic Grey from the Eskimo Kisses collection available ast Create4Fun.
Tools: Spellbinders 'Circle' & 'Scalloped Circle' dies, Cuttle bug 'Ice Crystals' folder 'Snowflake' Border & Corner punch, 'Snowflake' punch all by Martha Stewart and the giant snowflake was created using the Cricut 'Joys of the Season' cartridge all items available from Create4Fun.
Misc: Twinklets & Glamour dust.
Thanks for looking...Have a great day!

maandag 19 oktober 2009

Spooky!

Hi there, I am back today with a fun Halloween card to share with you.

The image is a vintage stamp by Penny Black and sadly is now discontinued... but there is always a huge range of Penny Black stamps in stock for all occasions. I have stuck to traditional Halloween colours and as always managed to find a perfect match to my papers using ColorCore cardstock. The spiders web was made by using the Cricut 'Wild Card' cartridge which has lots of fun shapes for Halloween including a Pumpkin, Spider, Bat and some lovely Halloween frames too and all so easy to achieve at the touch of a button using my 'Cricut Expression' my most used piece of crafting equipment that I just couldn't live without...I even use it for all my matting and layering to ensure I get great results everytime.

Thanks For Looking.

Debbie x