Posts tonen met het label Spacers. Alle posts tonen

zondag 4 april 2010

DCWV Sweet Stack

Happy Easter!

Here's a card I have made with one of the new Magnolia stamps and the DCWV Sweet Stack.  I just love this stack, the colours are so pretty.  The border along the side of the gatefold I have cut from one of the sheets from the Sweet Stack.


I have used Spellbinders Labels 4 Nestibilities for the image and sentiment inside, and have machine stitched around the papers


Thanks for looking, enjoy the rest of the holiday weekend


donderdag 8 oktober 2009

cheers

Ik heb een kaartje gemaakt met mijn nieuwe Martha Stewart randpons 'Cheers'. Een hele mooie pons om te gebruiken. Create4fun heeft heel veel van deze Martha Stewart randponsen. Tot vrijdagavond 9 oktober 21.00 is de pons Cheers in de aanbieding voor € 12,95!!


Ook heb ik bloemen gemaakt met de Spellbinders Shapeabilities Flower Creations. Ik heb 2 sets gestanst en geembost en de ene set met donkerbruine inkt gesponst en de andere set met lichtbruine inkt. Dan kun je ze leuk 'mixen'. De lichtbruine inkt heb ik ook gebruikt bij de embossing en de rand van het stempelafdrukje.


Op de foto kun je goed zien dat er 3 laagjes op elkaar zitten. Ik heb ze vastgezet met een spacer en een kleine brad.


Ik vond het plaatje er wel goed bij passen.


-stempelafdrukje Forever Friends ingekleurd met Derwent Coloursoft potloden
-scrappapier uit The Stack 4 van DCWV
-Martha Stewart randpons Cheers
-Cuttlebug embossing 'Victoria' bewerkt met Colorbox inkt
-bloemen gemaakt met Spellbinders Shapeabilities Flower Creations gesponst met Colorbox inkt -2 spacers Flower Cap
-2 kleine brads

xxx Anne-Marije


woensdag 16 september 2009

Glimmer Mists


I have used Tattered Angels Glimmer Mists and Distress Inks to change the colours on these flowers and have used spacers and rhinestone brads for the centres


vrijdag 11 september 2009

Magnolia Card


I used Prima Flowers and layered these on to an acetate flower punched with a Retro Flower punch

I also adhered tiny (1mm diameter!!!) crystals to her necklace and bracelet I used Spellbinders Nestabilities Ovals and Labels 5 and Cuttlebug Devine Swirls embossing folder behind the image


donderdag 27 augustus 2009

Grußkarte

Hier noch einmal eine Karte mit dem tollen " Lemonade Paper Pad "Papier von Basic Grey.

Card Recept : Cardstock Color Core
Motivpaper: Lemonade Paper Pad (Basic Grey)
Flowers und Spacers
Martha Stewart Punch
Nähmaschine
Spellbinder : Nestabilities Classic Oval und Scallop Large
Stempelkissen : StazOn Black und Saddle Brown
Stanzer: Paper Shapers Large Punch Folk Heart
Schmetterling : Slice , Design Card Basic 2

Liebe grüße Tina46


maandag 24 augustus 2009

Spacers


Sinds kort verkoopt create4fun ook spacers..Ik vind ze geweldig en heb ze dan ook lekker veel gebruikt op deze kaart! De tekst heb ik gestempeld in een kleine nestabilitie label small en de bloemen zijn geponst met de Retro flower punch large en medium van EK Succes.
De stempel is een gorjuss girl van sugar Nellie.

Ik wens jullie een mooie dag toe vandaag,

Groetjes Tiets xx

dinsdag 18 augustus 2009

Punched Flower Tutorial

I have had lots of requests to show how I make my flowers, so here’s how I do it. I must say that I first got the idea off the mega talented Deb, so this is my version - there is probably a very much easier and simpler way to do it but this works for me :)

I use various flower punches but these are my current favourites and what I used to make these flowers

McGill Floriano, Stampin Up 5 Petal (McGill Starflower is my preference but my daughter has claimed it!! – the petals are deeper cut so much easier to work with) and the medium Retro flower punch.

You will also need card (not too thick) in one or two colours and / or a scrap piece of designer paper (reasonably heavy weight if possible), a scroll or text stamp, ink, a dauber or sponge to apply the ink, 6mm and 3mm embossing tools, a pair of scissors and an embossing mat – my favourite is an off- cut of vinyl flooring, it has just the perfect “give” for embossing paper and prevents wrinkled edges – honest!!

flower-tut-1

Punch out the largest size and stamp a scroll pattern/text on the front with a matching ink

flower-tut-2

Ink the edges of the flower and cut into the centre (not all the way through)

flower-tut-3

Using the 3mm embossing tool emboss a centre line on each petal (front of flower) flower-tut-4

Flip flower over and using the 6mm embossing tool emboss around the edge of each petal, then move into the centre but don’t emboss over the line you had previously embossed

flower-tut-5

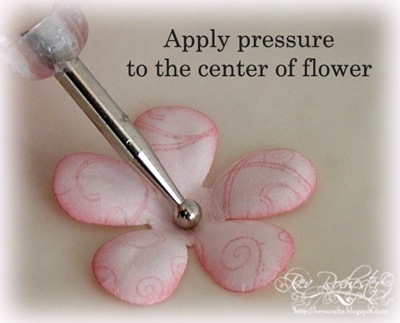
Flip the flower back over (face up) and apply pressure with the embossing tool to the centre of the flower, making small circular movements to help cup the flower and lift the petals

flower-tut-6

For extra “movement” curl the petals over your finger

flower-tut-7

Your flower should look like this

flower-tut-8 Repeat this another 2 times, just ink the edges of the DP layer and emboss as before

flower-tut-9

Now although I love these Tibetan spacers they are the very devil to fix to the flower due to the curve. Soooo, to get rid of all your stress, take a hammer and a piece of wood, place the spacer on the wood face down and give the spacer a good few wallops to flatten it. Aaah that feels much better!

See the difference – so much easier to fix with a brad now. Spacers can be found here

flower-tut-9a

And there you have it, a pretty flower that matches your card perfectly. :)

flower-tut-10

And especially for Jacque – here’s the flower with the mulberry roses.

Punch out your flower (I use the medium retro punch for this), ink the edges and emboss the back with a 3mm embossing tool.

flower-tut-11

After embossing each petal the flower should be cupped like this

flower-tut-12

Flip the flower over and apply pressure to the centre as the previous flower, moving in tiny circles.flower-tut-13
Fix the mulberry rose to the centre of the punched blossom with a strong glue (I use Glossy Accents … for everything lol)

flower-tut-14

I hope you will give these a try.


Bev x