Posts tonen met het label McGill. Alle posts tonen

woensdag 26 januari 2011

Dance My Darling

Dit kaartje heb ik gemaakt voor mijn ouders die aanstaande zondag 24 jaar getrouwd zijn.
I've made this card for my parents who are married for 24 years coming Sunday.

Ik heb de digi Dance My Darling van Karen's Doodles gebruikt. Ik vind dit zo'n schattige digi....
I've used the digi Dance My Darling from Karen's Doodles. I think this digi is so cute...

Derwent Coloursoft potloden: C100-C130-C180-C200-C530-C580-C650-C670-C680-C700

Ik ben weer eens lekker met mijn Cricut Expression bezig geweest. Ik heb hem de laatste tijd niet zoveel gebruikt, dus daar moet verandering inkomen! Ik heb de cijfers 24, de swirl en het hartje uitgesneden met de cartridge Don Juan en de bloem met Accent Essentials.
I've been nice busy with my Cricut Expression. I haven't used him often the last time, so that has to be changed! I've cut the numbers 24, the swirl and the heart with cartridge Don Juan and the flower with Accent Essentials.

-digistamp Dance My Darling van Karen's Doodles ingekleurd met Derwent Coloursoft potloden
-scrappapier Olivia van Basic Grey
-ColorCore cardstock Heartfelt
-Papicolor cardstock
-Nestabilities Standard Circle Large en Scalloped Circle Large
-Cricut Expression, Don Juan, Accent Essentials
-bloemetje gemaakt met de pons baby blooms van McGill
-1 parel
-1 grote brad

Nog een fijne dag!
Have a nice day!

xxx Anne-Marije

zaterdag 9 oktober 2010

Kerst met een freebee


Deze kaart gemaakt voor de nieuwe challenge bij Create4fun .
De vorm van de kaart is uitgesneden met de nestabilities Labels Eight.
De digi is een freebee die je zo mag meenemen..
De digi is uitgesneden met de nestabilities classic Ovals.
Bloemen zijn van Murlberry roses red.
Takjes zijn van EK Succes.
Meeldraadje rechtsboven is van McGill; Botanical Stardust.
De gaatjes heb ik met een gaatjestang gemaakt en daar lint doorheen geknoopt, die op hun beurt weer vastgeknoopt zijn met een stukje scrappersfloss.


Groetjes van bernadet

vrijdag 5 februari 2010

Easter Basket - Paper Weaving


I have made a paper weaving basket for the Just Magnolia challenge, and have used some Martha Stewart punches: deep edge  Doily Lace and Doily Lace.  I have used oval and scalloped oval nestibilities for the images, and a McGill Botanical Pine Punch for the leaves.


Thanks for stopping by
Bev x


zondag 24 januari 2010

Cat & Bird

Vandaag een fleurig kaartje.
Today a card with a lot of colours.


Het stempel is van Whipper Snapper en heet Cat & Bird.
The stamp is from Whipper Snapper and calls Cat & Bird.


Het roze ColorCore cardstock heb ik geembost met Cuttlebug embossing stencil Floral Fantasy. Daarna heb ik het wat opgeschuurd.
Ik heb het hele plaatje bewerkt met roze Colorbox inkt.
The pink ColorCore cardstock is embossed with Cuttlebug embossing stencil Floral Fantasy. After that I scrubbed it.
I have inked the whole image with Colorbox ink.


-stempelafdrukje Whipper Snapper ingekleurd met Derwent Coloursoft potloden
-scrappapier uit The Stack 6 van DCWV
-Nestabilities Large Classic Inverted Scalloped en Classic Scalloped Circle Large
-ColorCore Cardstock PP030 Fuschia Fizz
-Cuttlebug embossing Floral Fantasy, geschuurd
-2 Prima flowers, 2 roosjes en 4 halfparels
-McGill pons Botanical Leaves
-plaatje bewerkt met roze Colorbox inkt

Nog een fijne zondag!
Have a nice Sunday!

xxx Anne-Marije

vrijdag 9 oktober 2009

Halloween Giftbag


Hallo,
bei
Stempelmagie

gibt es diese Vorlage
für eine kleine Halloween Tasche:
Ich habe diese kleine Tasche nach der Vorlage gebastelt:


Vom Shop habe ich dafür benutzt:
Cardstock von ColoreCore
Blattstanzer von McGill

donderdag 8 oktober 2009

Small Basket

Hi,
ich möchte Euch zeigen, was ich nach dieser Vorlage gebastelt habe:


Dieses kleine Körbchen.
Das steht nun auf meiner Fensterbank zwischen den Blumen :-)


Ich habe es aus Cardstock von ColoreCore gemacht.
Außerdem habe ich hier diverse Magnoliamotive benutzt.
Der Blattstanzer ist von McGill .


woensdag 23 september 2009

Spellbinders Nestibilities


Here's a card made using Blossom Nestibilities, Circle Nestibilities, McGill Pine punch, 1" circle punch

I have used Liquid Applique and heated it with a heat gun till it bubbles to give texture to the hat.


zaterdag 19 september 2009

Vintage en verjaardagskaartje


Vintage kaartje.
Komt van het paperpad Life 's Journey van K&Company.
Dit keer weer eens de coloursoft kleurpotloden van Derwent en doezelaars uit het stof gehaald hihi.
Het stempelafdrukje is uitgestanst met de nestabilities labels five, ook het kleine labeltje is daarmee uitgestanst.
De bloemen zijn weer uitgestanst met de Shapeabilities Daisy Heads, een lintje en een roosje en de brads medium erbij gebruikt.
De blaadjes zijn uitgeponst met een pons van punch&bunch
De randjes beïnkt met een kleurtje van de Colorbox
OP de onderkant van de kaart heb ik nog een randjesmal van de Double Do gebruikt.


Kaartje voor onze oudste dochter Marij, die gisteren alweer 24 jaar is geworden.
Dit is de voorkant.
Papier komt van het paperpad life 's Journey van K&CompanyWeer een stempel van Inky Impression; Angelica's day dream gebruikt
Angelica zit op een bloem van quickuts REV-0072, waarvan de cirkel is uitgesneden met de cirkelsnijder C-1500.
retro flower pons X large en large van EK Succes.
scrappersfloss, knoopjes en een klein papieren roosje gebruikt


En dit is de binnenkant.
De tekst is uitgesneden met de nestabilities labels five en de fantastische bloemen
zijn uitgesneden met de shapeabilities Daisy Heads.
Daarboven zit nog een meeldraadje, uitgeponst met de botanical starburst van McgillDe blaadjes zijn uitgeponst met een pons van punch&bunch.Zelfklevende swirls van pareltjes Prima Marketing
De randjes zijn weer beïnkt met een Cat 's Eye van Colorbox

Groetjes van Bernadet

woensdag 9 september 2009

Whiff of Joy

I have made a Whiff of Joy card and have used the McGill Perfect Petals punch to make the flowers and the Martha Stewart Frond Branch Punch for the leaves. I've also used Spacers in the centers of the flowers and a Fiskars Threading Water punch for the scalloped border.


woensdag 2 september 2009

A gift for Baby

I found the diaper template here and tweaked the shape a bit. I also enlarged it to fill an A4 sheet for a bigger pouch. I can't remember who the paper is by, I used the lot and although I wrote the info down I can't find the bit of paper, sorry.

The box/bag is made from a template off SCS here

And the card, plain and simple


Tools: McGill Pine Branch punch, Nestibilities Labels 4, Scor pal, McGill Tag punch

Thanks for stoppping by
Bev x


zondag 30 augustus 2009

Stampavie & More and Roses on Paper

Here’s a card using  Sarah Kay stamp.  I used a sewing machine to stitch along the edges of my card.sarah-kay-spring-is-back-1 
I used a McGill fancy square punch for the centre border. I punched out four fancy squares then cut them in half and adhered them to the strip of cherry paper.sarah-kay-spring-is-back-2

For the bow trim all I did was sew four loops and two tails of ribbon together with the button. Here's a close up of the bow trim and also the punched border.sarah-kay-spring-is-back-3 


Thanks for stopping by,

woensdag 26 augustus 2009

house mouse


Create4fun heeft nu ook de schitterende stempels van house mouse .
De laatste restjes van het paperpad lemonade van Basic Grey, dus het was ff zoeken welke kleurtjes het moesten worden.
vlinderpons van Martha Stewart
takjespons botanical pine en botanical fern van McGill
cirkelsnijder C-1500

Groetjes van Bernadet

dinsdag 25 augustus 2009

inky impressions ' Angelica


Paperpad lemonade van Basic Grey
paper shaper pons X large en large van EK Succes
botanical pine van McGill
randpons maple leaves en vlinderpons van Martha Stewart
Het snoezige stempeltje is van Inky Impressions Angelica.
Cirkelsnijder C-1500
en quickutz REV 0072


Wederom met een stempel van Inky Impressions . Ze zijn ook zo lief hè.
paper shaperpons X large en large van EK Succes
randpons van Martha Stewart
deze 2 kaartjes zijn gemaakt met een sketch van Bev.


Groetjes van Bernadet

zaterdag 22 augustus 2009

Congrats


Bij bovenstaand kaartje heb ik het papier van 'Ducks in a row' van October Afternoon gebruikt.
De sketch is van Bev.
Vlinderpons en randpons maple leaf van Martha Stewart.
Botanical Fern pons van McGill.
Papershaper X large van EK Succes.
REV 0072 van quickut
cirkelsnijder C-1500
Stempel snoesje

Groetjes van Bernadet

dinsdag 18 augustus 2009

Punched Flower Tutorial

I have had lots of requests to show how I make my flowers, so here’s how I do it. I must say that I first got the idea off the mega talented Deb, so this is my version - there is probably a very much easier and simpler way to do it but this works for me :)

I use various flower punches but these are my current favourites and what I used to make these flowers

McGill Floriano, Stampin Up 5 Petal (McGill Starflower is my preference but my daughter has claimed it!! – the petals are deeper cut so much easier to work with) and the medium Retro flower punch.

You will also need card (not too thick) in one or two colours and / or a scrap piece of designer paper (reasonably heavy weight if possible), a scroll or text stamp, ink, a dauber or sponge to apply the ink, 6mm and 3mm embossing tools, a pair of scissors and an embossing mat – my favourite is an off- cut of vinyl flooring, it has just the perfect “give” for embossing paper and prevents wrinkled edges – honest!!

flower-tut-1

Punch out the largest size and stamp a scroll pattern/text on the front with a matching ink

flower-tut-2

Ink the edges of the flower and cut into the centre (not all the way through)

flower-tut-3

Using the 3mm embossing tool emboss a centre line on each petal (front of flower) flower-tut-4

Flip flower over and using the 6mm embossing tool emboss around the edge of each petal, then move into the centre but don’t emboss over the line you had previously embossed

flower-tut-5

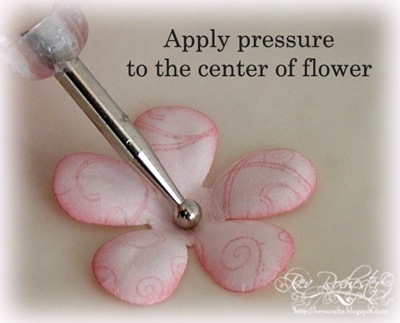
Flip the flower back over (face up) and apply pressure with the embossing tool to the centre of the flower, making small circular movements to help cup the flower and lift the petals

flower-tut-6

For extra “movement” curl the petals over your finger

flower-tut-7

Your flower should look like this

flower-tut-8 Repeat this another 2 times, just ink the edges of the DP layer and emboss as before

flower-tut-9

Now although I love these Tibetan spacers they are the very devil to fix to the flower due to the curve. Soooo, to get rid of all your stress, take a hammer and a piece of wood, place the spacer on the wood face down and give the spacer a good few wallops to flatten it. Aaah that feels much better!

See the difference – so much easier to fix with a brad now. Spacers can be found here

flower-tut-9a

And there you have it, a pretty flower that matches your card perfectly. :)

flower-tut-10

And especially for Jacque – here’s the flower with the mulberry roses.

Punch out your flower (I use the medium retro punch for this), ink the edges and emboss the back with a 3mm embossing tool.

flower-tut-11

After embossing each petal the flower should be cupped like this

flower-tut-12

Flip the flower over and apply pressure to the centre as the previous flower, moving in tiny circles.flower-tut-13
Fix the mulberry rose to the centre of the punched blossom with a strong glue (I use Glossy Accents … for everything lol)

flower-tut-14

I hope you will give these a try.


Bev x